Being in a group was extremely difficult, this is because the communication within the group was not up to scratch. because of this the final game is missing a lot of assets which were meant to be designed and made by members that have slacked. One of these assets that was the character, because the character was not finished we had to end up using a character that we had gotten from the asset store. I was in charge of making one monster and so was everyone else, but because two members have slacked off and did not provide their assets more works was put on everyone else so all the enemies are the same.
If I could have I would have given the two dad didn't do any good work less important work, instead of work that halted the project from being complete, or if at all possible change the group members, because too much arguing took place.
Showing posts with label Gameplay and interactivity. Show all posts
Showing posts with label Gameplay and interactivity. Show all posts
Friday, 8 April 2016

Gem of Destruction #5
My next job was make the player able to attack so that he can actually kill the enemies and earn points instead of just being able to only being killed by the enemy. To do this I made a projectile controller script, this will control the direction of the projectile, the speed as well and actually make it work and kill the enemies. Also to make it look cleaner and to make sure that the projectile doe not make unity glitch out I added a life time so the game object would get destroyed after 0.5 seconds.

I then had to add a few lines to the player controller script that was made by one of my group members, this will call the bullet as well as make it work by the bullet using the player controller and only coming out of the empty child that I put into the player and named fire point.


I then had to add a few lines to the player controller script that was made by one of my group members, this will call the bullet as well as make it work by the bullet using the player controller and only coming out of the empty child that I put into the player and named fire point.


Thursday, 7 April 2016
Gem of Destruction #4
After I had sorted the animations out, put them in order, made the transactions and then set the conditions for the transaction between the animations to take place I go into code. first I needed to get the bear to walk from side to side, I also got the bear to flip and go the other way if a wall or an edge is hit. after the bear starts moving from one side to the other I called the walking animation so that when the bear is moving the animation is played.

To make the bear flip to walk the other way when it hits a wall I had to make a empty game child in the bear call it wall check and then change the way it looked to a ball so I can see it at all times in the scene. I then set it if the wall check hits a wall bear will then flip the vectors, I then do the same but for edge check.


Gem of Destruction #3
After I had imported the sprite sheets, I put them in the sprite editor where I had cut the images ups so they become their own images to be put in the animation tab to create the animation. I then go on the animator tab to set the order of the animations, but because the bear is going to be an enemy which will be constantly on the move it does not need any idle animation so the default animation will be the walking animation.
 I then have to add conditions to the transitions on the animations, this will allow me to call the conditions in code to play the animations when I need them to play. For this I have used two trigger conditions so I can call the attack animation when the player enters the trigger and then it goes back to the walking animation when the player leaves the trigger.


Gem of Destruction #2
I started re-designing my monster again, but instead of making a golem, I drew a silhouette of a bear and drew a gem on its chest as well as made the eyes In the colour pallet of the gem. I did this to show that the bear is being possessed by the gem.


These are the sprite sheets that will be imported in Unity, once I import these as an asset and put them in the sprite editor in unity, I will be able to cut each individual image which will then allow me to drag each image into the animation and change it to make it look good as I can.

This is the design that I had come up with, I will also be using the se two different positions as the base for the attack and walking sprite sheets, which I will be using to animate the bear using the sprite editor in unity.


Gem of Destruction #1
This project was group project where we had to produce a 2D Game of our choosing, everyone in the group must produce at least one Art/Visual Asset as well as one piece of code. The game must have a score system, menu as well as some kind of combat or goal that can be reached.
One of my jobs was designing the platforms for the game, as well as one of the monsters to go in the game for the character to fight. We decided to make a platformer, with the colour pallet being black and grey, and purple signifying the gem colour.


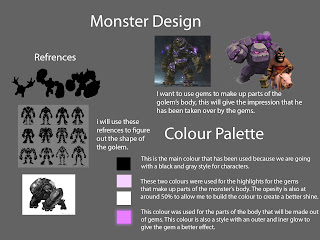
One of my jobs was designing the platforms for the game, as well as one of the monsters to go in the game for the character to fight. We decided to make a platformer, with the colour pallet being black and grey, and purple signifying the gem colour.


This is the art bible page for the platforms as well as the monster that I had first designed, this shows the references that I had used for both the platform and monster designs, also describing the colour pallet that I used and why I went with these references. After putting my assets into the game some of the group had said that the platforms did not fit in well with the style of the game, so we decided to give the platforms to another member of the group.
Friday, 11 December 2015
Coding
This was very hard for me because I am completely new to coding, i have decided to code doors so that they rotate open, as well as flickering lights and i also coded two keys. what i did i used the codes that we made in class and then dragged them to there respective models and the changed the and fixed the errors one by one as they come up.


This code was for my double doors, these doors were to open by rotating, luckily i did not have that much to change but i did encounter a problem that one of the doors would rotate out of the walls and into the middle of the path. No matter how i change the pivot point the door would not rotate how it is meant to. Another Problem I had was taht my flickering lights stoped working whicgh meant i had to start from the biggining witha that code and any other codes related to it
Monday, 16 November 2015
Making models
My other project that i have to do is make a walkthrough on unity, this walk through must include code using C+, it has to have at least 3 different scripted events, as well i must download the standard assets from the assets store. This is because from the standard assets I will have to put the first person controller into the game, this will allow me to play the game that i will be making.
I will start of by modeling the map for the game, i used the one sheet that i made for ideas on the kind of layout that i wanted for my game. i decided to make multiple corridors and the make a stair case leading to different paths but only one is the real one. for this i simply just used cubes and planes to extrude out and and duplicate to make the layout

the next then i modelled where the rooms that the player can go into, all i needed to do was model one room and the when i put the model in unity i just duplicate the room and just move into position. Again i just used cubes, but i also modelled a sink in there as well.

The next thing i modelled was the bed, now with the bed i used the Ncloth tool to make the blanket as well as the pillow, i did this to make the blanket as well as the pillow as detailed and smooth as possible.

the next thing i made was the lamps that were going to doted around the scene, these lamps are going to be lamps that look a different i made them in to a spiky flower shape by extruding a sphere. to be honest i made this by accident but i decided to stick to it. Im using these because my game is set in an asylum that has been taken over by hell.

the next thing i made was the computer to be put into the security room as well as the security room itself, this is where the player will have to go at the start of the game to turn the power back on. I also then Made the doors which will be scripted so they rotate open when the player walks in a trigger as well some will be locked so you will need a key to open them.


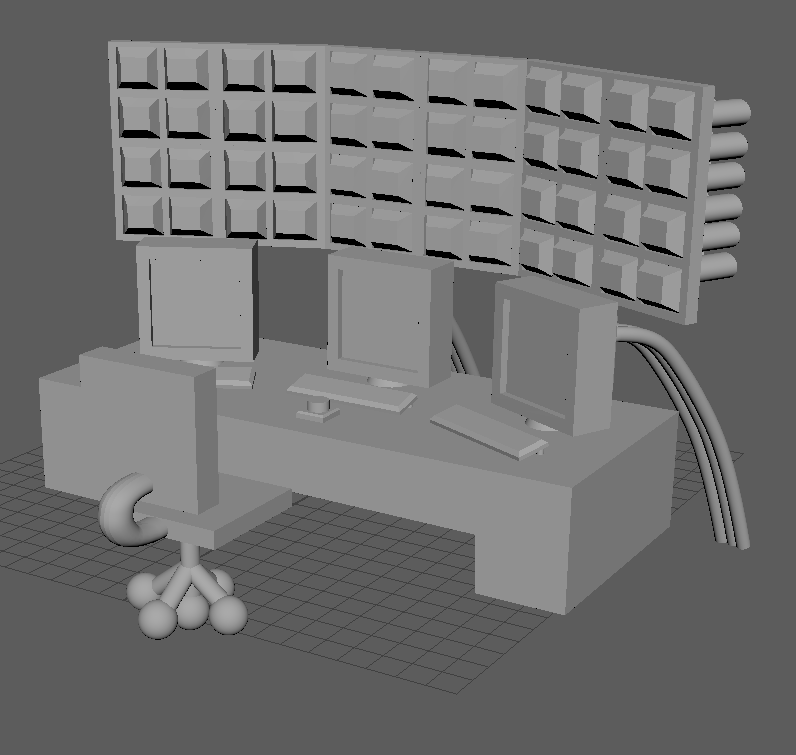


Finally the last thing that i modelled was the roof as well as the roof lights which i will make dim so they don't interfere with the glowing of the lamps as well as i will be coding them to flicker, this will give them a better effect visually and it will set the mood of the game.


Monday, 12 October 2015
Game level
The assignment was to start designing our level, but not in 3D, i had to do a one sheet, a story board as well as had drawings about my level, for example i had to set where the level is set and what does the walk through have in store.
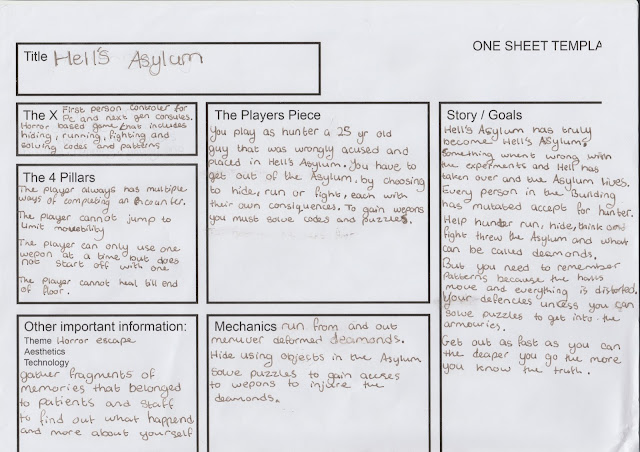
All these things are covered in the one sheet, the story board and the map of the level.

this is my one sheet, on this one sheet i outlined whats happening in the game and the level, who the player is as well as the back story. i have stated the goals of the player and the point of the game, the bases and the rules of my game which are the four pillars.

This is my story board, as you can see its quite brief but at the same time i put enough detail in so you can tell whats going on and not get lost. this is the story board for my walkthrough level which is simply walk, touch, run and hide, as you can see with the shading that i used on the brief drawings the game will be cantered around dark and creepy atmospheres.

This is the overview drawing of my level, as well as where you start off in, i have chosen to set my game in an asylum, this Asylum is called hell's Asylum, this is because inside it is a close someone will get to hell on Earth, but after a human experiment when rong a door to hell actually opened and the Asylum is not Hell's actual Asylum. So i have tried to make it follow a creepy and dark look to fit the mood of the game. for example the wall paper is coming as well as broken windows and long dark corridors. as my level develops i shall be uploading more maps as well as updated one sheets.

This is my story board, as you can see its quite brief but at the same time i put enough detail in so you can tell whats going on and not get lost. this is the story board for my walkthrough level which is simply walk, touch, run and hide, as you can see with the shading that i used on the brief drawings the game will be cantered around dark and creepy atmospheres.

This is the overview drawing of my level, as well as where you start off in, i have chosen to set my game in an asylum, this Asylum is called hell's Asylum, this is because inside it is a close someone will get to hell on Earth, but after a human experiment when rong a door to hell actually opened and the Asylum is not Hell's actual Asylum. So i have tried to make it follow a creepy and dark look to fit the mood of the game. for example the wall paper is coming as well as broken windows and long dark corridors. as my level develops i shall be uploading more maps as well as updated one sheets.
Wednesday, 8 April 2015
Hell's Asylum Map
I Have drawn out a layout of the map of my game world by hand on paper, I used this as reference when I was designing my level on Maya and changing things around in unity, this allowed me to stay close to the layout I wanted.


Subscribe to:
Posts (Atom)